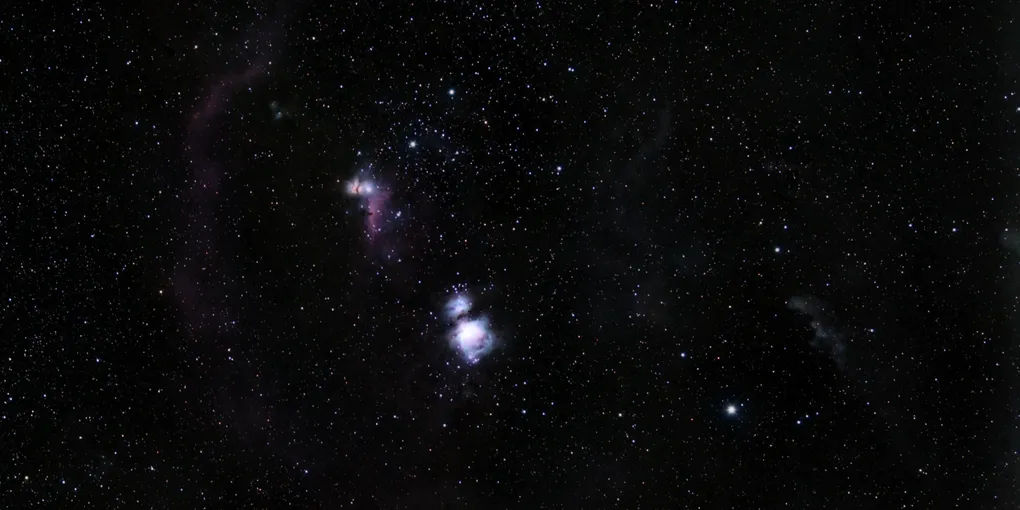
Nikon D3400 Astrophotography: A Beginner's Guide
Contents
- Can the Nikon D3400 Be Used for Astrophotography?
- Images Captured With My Nikon D3400
- My Current Astrophotography Setup
- Untracked Astrophotography With the Nikon D3400
- Tracked Astrophotography With a Star Tracker
- Nikon D3400 Settings for Astrophotography
- How I Focus the Nikon D3400 at Night
- Why Calibration Frames Matter
- Lessons Learned Along the Way
- Frequently Asked Questions
- Final Thoughts
Astrophotography can seem intimidating when you’re starting out. Dedicated astronomy cameras, equatorial mounts, guiding systems and image processing software often make it feel like you need expensive equipment before you can capture anything worthwhile.
That wasn’t my experience.
I started with a Nikon D3400, a basic tripod and a lot of trial and error. Since then, I’ve used the same camera to photograph targets such as the Orion Nebula, Rosette Nebula, Horsehead Nebula and Running Man Nebula. Along the way I added a star tracker, improved my processing workflow and learned what settings work best for this camera.
You can learn more about my astrophotography journey on the About page.
In this guide I’ll share the Nikon D3400 astrophotography settings I actually use, explain the differences between tracked and untracked imaging, and cover some of the lessons I’ve learned while shooting from a suburban backyard under Bortle 6–7 skies.
Can the Nikon D3400 Be Used for Astrophotography?
Absolutely.
The Nikon D3400 includes most of the features that matter for astrophotography:
- Manual mode
- RAW (.NEF) image files
- Bulb mode
- Live View focusing
- Good battery life
- Low cost used market availability
Many beginners assume they need a dedicated astronomy camera before attempting deep-sky imaging. While dedicated astro cameras have advantages, the D3400 is capable of producing surprisingly good results when paired with a suitable lens and enough exposure time.
If you already own a Nikon D3400, there is no reason not to start with it.
In fact, learning astrophotography with a DSLR teaches many of the same fundamentals that apply to more advanced equipment later on, including focusing, tracking, framing, calibration and image processing.
Images Captured With My Nikon D3400
Before getting into settings and equipment, here are a few examples of what I’ve been able to capture using a Nikon D3400.
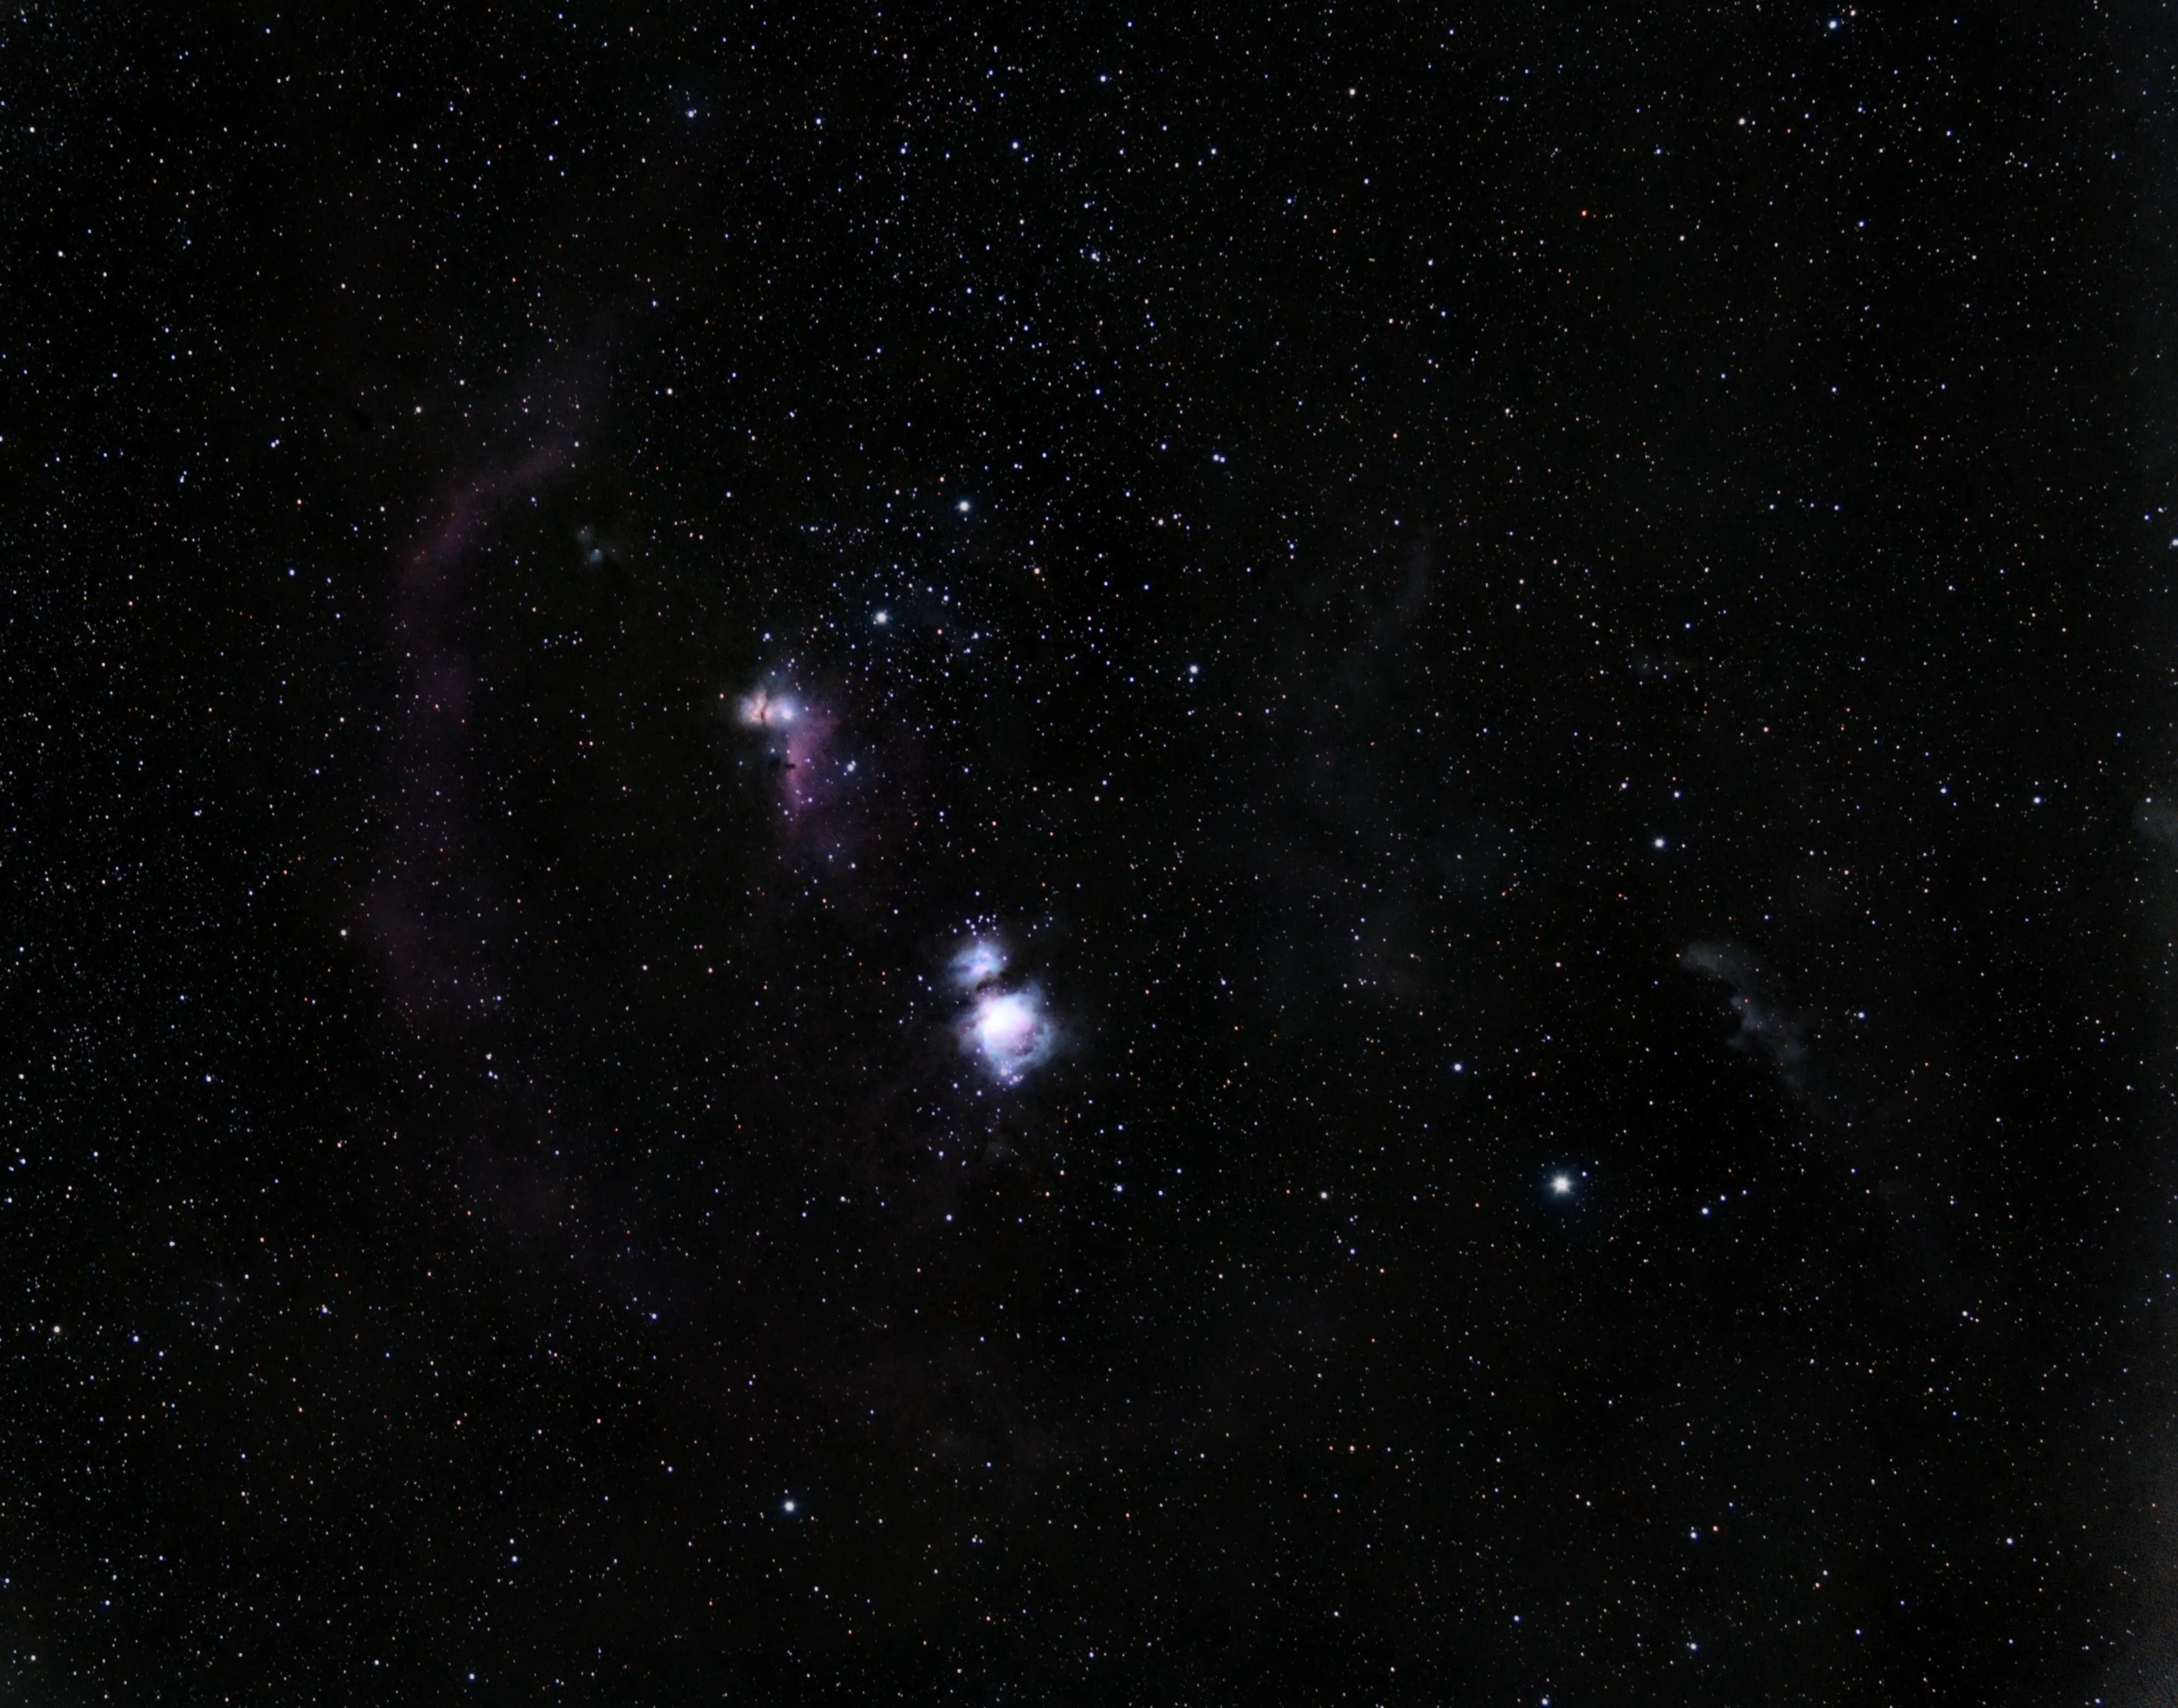
Orion Molecular Cloud Complex photographed using a Nikon D3400, Nikon 35mm f/2.8 lens and Sky-Watcher Star Adventurer 2i. Total integration time: 5h 47m.
View full image and acquisition details →
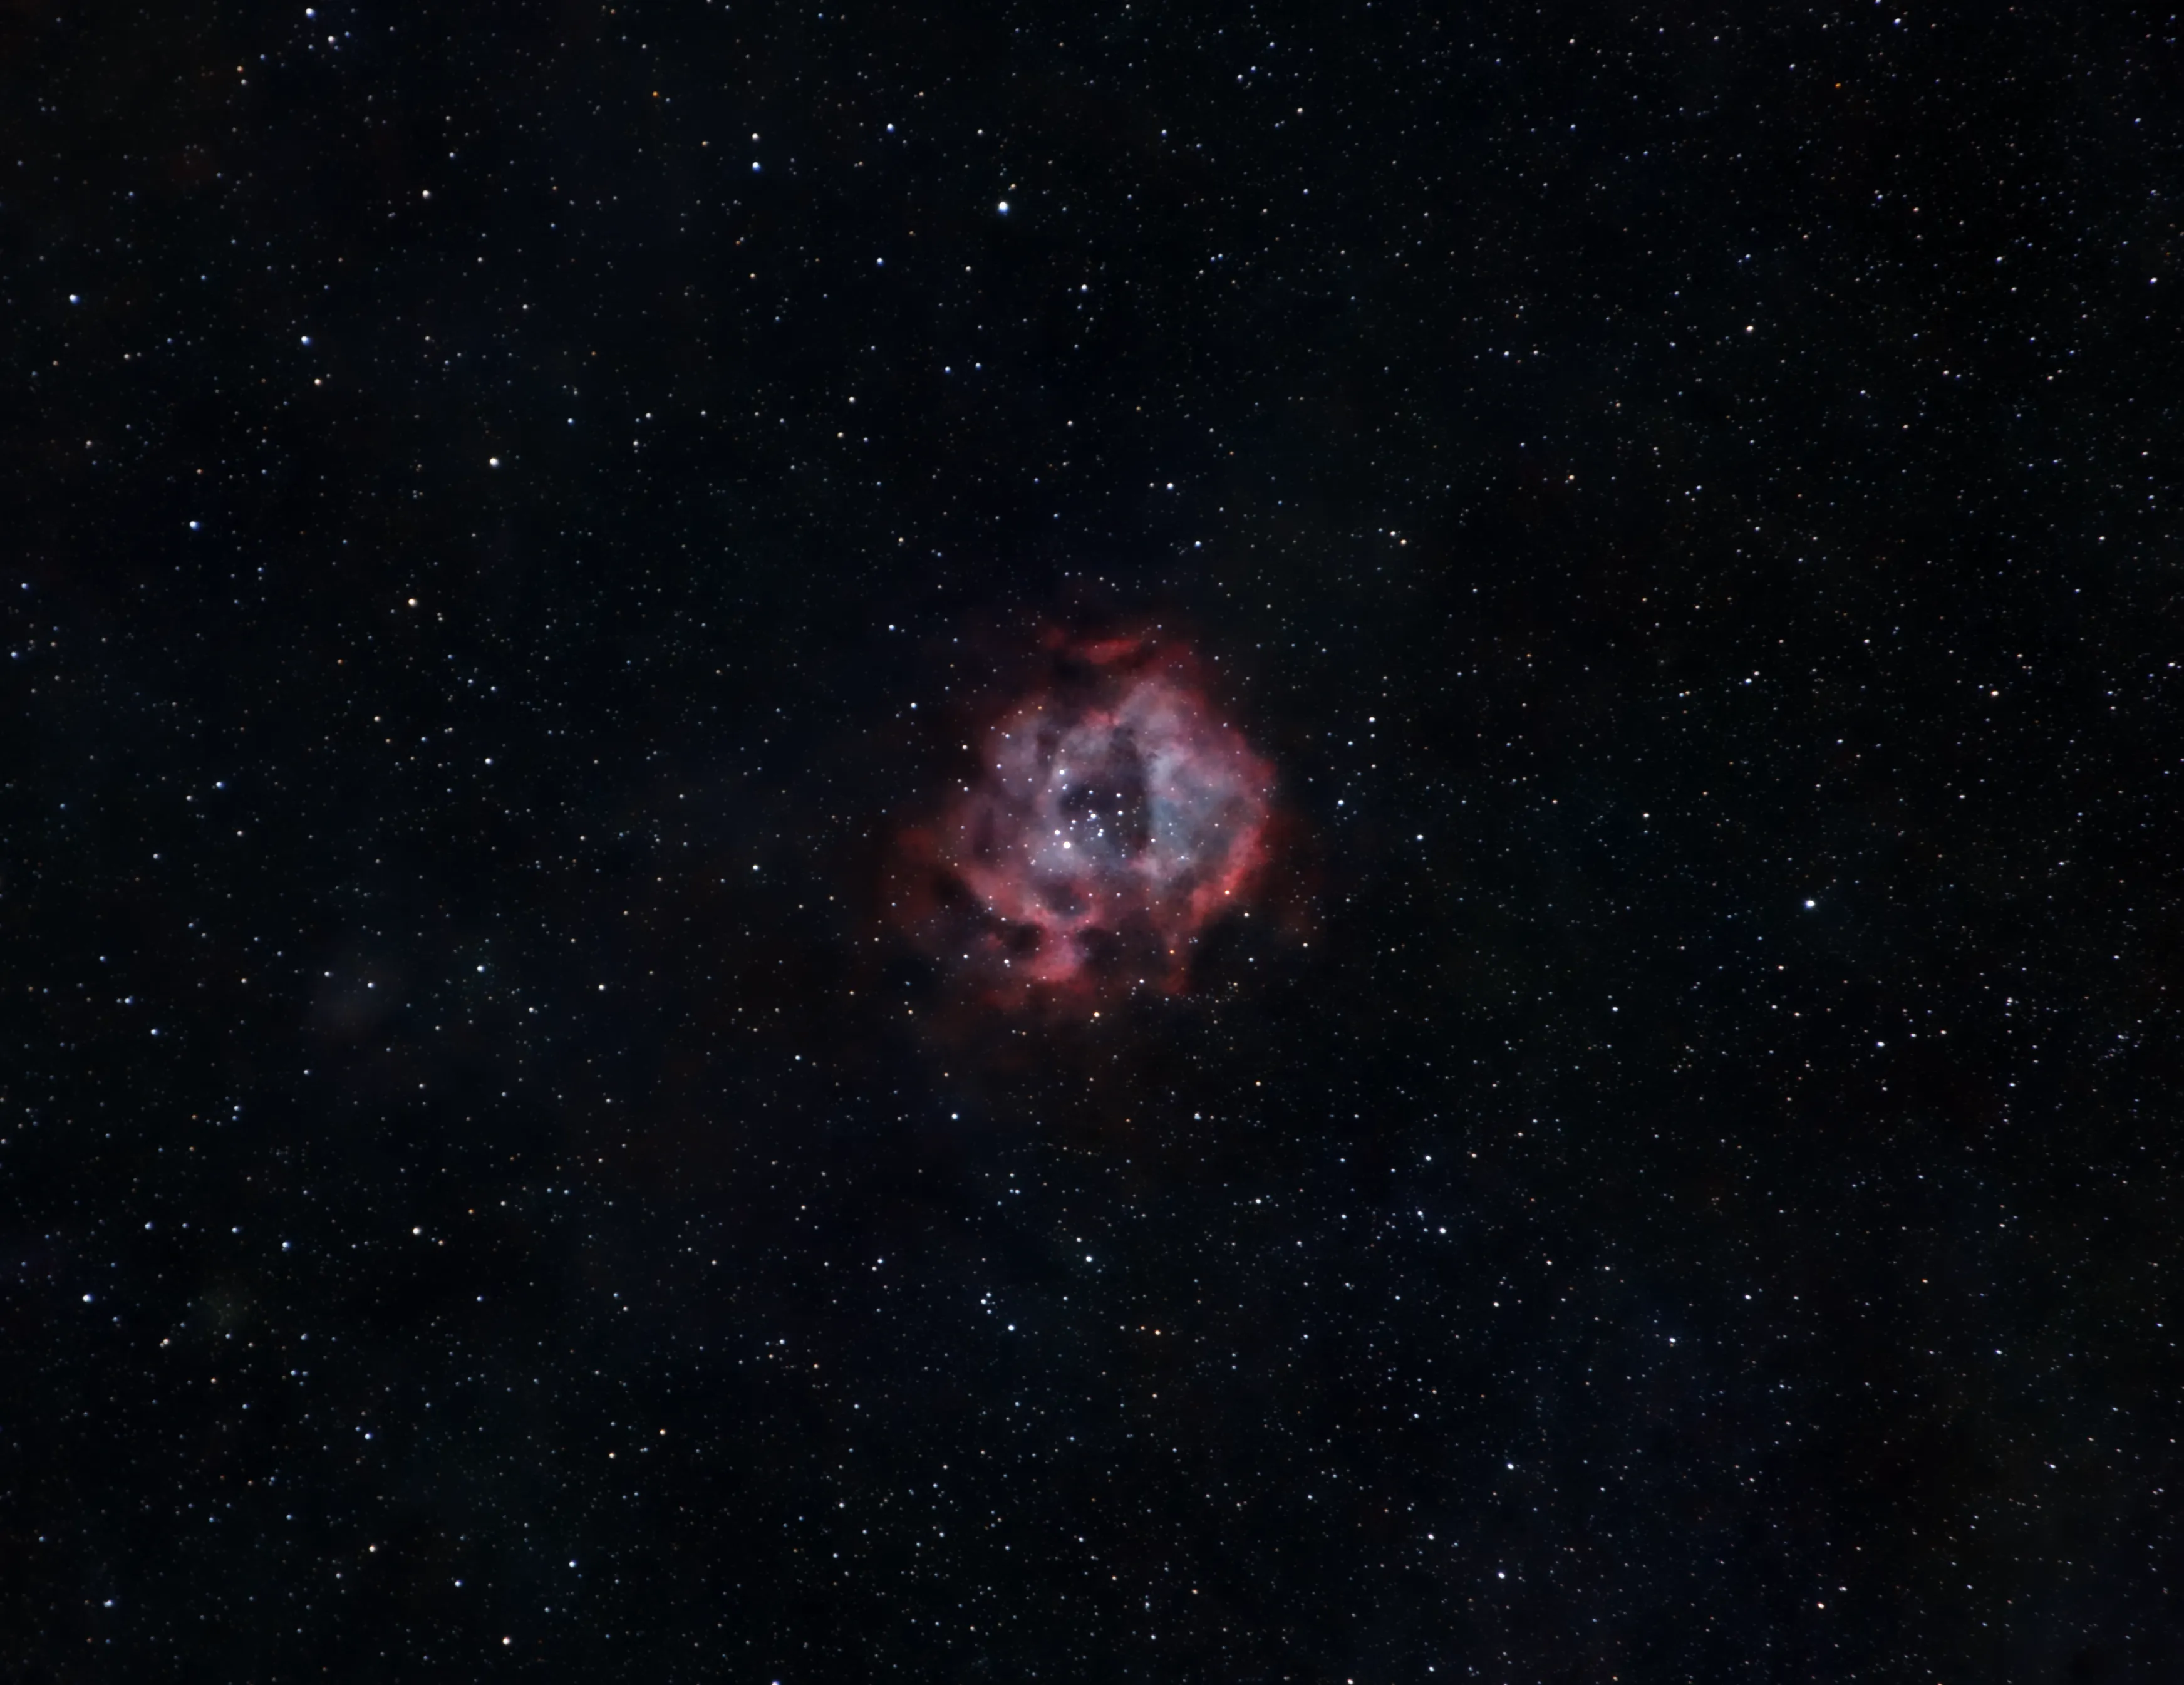
Rosette Nebula photographed using a Nikon D3400, Nikon 105mm f/6.3 lens and Sky-Watcher Star Adventurer 2i. Total integration time: 2h 31m.
View full image and acquisition details →
These images were all captured from a suburban backyard under Bortle 6–7 skies. They are not perfect, but they demonstrate what is possible with a beginner DSLR, a modest budget and enough patience.
You can see more Nikon D3400 astrophotography results in my gallery.
My Current Astrophotography Setup
My current setup is fairly simple:
- Nikon D3400 DSLR
- Nikon 35mm f/1.8 lens
- Nikon 18–105mm lens
- Sky-Watcher Star Adventurer 2i
- K&F Concept TM2324 tripod
For image acquisition, I use DigiCamControl to automate capture sequences and control exposures longer than 30 seconds on the Nikon D3400.
I also use a dew heater during colder months to prevent moisture from forming on the lens.
You can find a detailed breakdown of my astrophotography equipment.
Most of my imaging is done from home, which means dealing with light pollution, limited sky visibility and imperfect conditions. While darker skies would certainly help, I prefer spending more time under the stars from my home.
Untracked Astrophotography With the Nikon D3400
Like many beginners, I started without a star tracker.
My first deep sky attempts were done with the Nikon D3400 on a simple tripod. This is the most basic setup, but it is also a good way to learn the sky, camera settings and the limits of untracked imaging.
The biggest limitation is exposure time. Because the Earth is rotating, stars slowly move across the frame. If the shutter stays open too long, stars stop looking round and start turning into small trails.
At 35mm, I found that around 4 to 5 seconds was my practical limit if I wanted round stars. At 100mm, that dropped to around 1 to 1.3 seconds.
That is not a lot of time to collect light, especially under light polluted skies.
These settings are what I currently use with a Nikon D3400 and a 35mm lens for untracked astrophotography. They are a starting point, not strict rules.
| Setting | Value |
|---|---|
| Mode | Manual |
| File format | RAW |
| Focal length | 35mm |
| Aperture | f/2.8 |
| Shutter speed | 4 seconds |
| ISO | 1600 |
| Auto ISO | Off |
| White balance | Auto |
With short exposures, ISO 1600 helped make each frame bright enough to work with. I also tested ISO 3200, but the noise became more difficult to manage during processing.
Untracked imaging works best for wide targets. Constellations, the Milky Way, the Orion region and bright star fields are all possible. Smaller deep sky objects are harder because they need more focal length and longer exposure time.
The other challenge is framing. Without tracking, the target slowly moves through the frame. That means you need to stop, reframe and continue shooting. Later, during stacking, the edges of the final image need to be cropped.
Untracked astrophotography is not the easiest method, but it teaches you a lot. It helped me understand exposure length, star trailing, focusing and how much total integration time matters.
Tracked Astrophotography With a Star Tracker
Adding a star tracker was the single biggest upgrade I made to my astrophotography setup.
I currently use a Sky-Watcher Star Adventurer 2i, which compensates for the Earth’s rotation and allows the camera to follow the night sky during long exposures.
The difference compared to shooting from a fixed tripod is dramatic.
Instead of being limited to 4 or 5 second exposures at 35mm, I can comfortably shoot 30 second exposures and, with good polar alignment, even longer. That means each frame collects significantly more light, allowing faint nebulae and dust clouds to become visible.
Tracking also reduces the number of images needed to reach a given integration time. A project that might require over a thousand short untracked exposures can often be completed with a few hundred tracked frames.
Typical Tracked Settings
| Setting | Value |
|---|---|
| Mode | Manual |
| File format | RAW |
| Aperture | f/2.8 |
| Shutter speed | 30 seconds |
| ISO | 800 |
| Auto ISO | Off |
| White balance | Auto |
One of the first things I noticed after switching to tracking was that I could lower my ISO. With exposures that are six to eight times longer, ISO 800 became a much better choice than ISO 1600 or 3200.
The result was cleaner data and smoother backgrounds after stacking.
Tracking also makes framing easier. Instead of constantly repositioning the camera as the target drifts across the sky, the composition remains largely unchanged throughout the session. This means less cropping and more usable data in the final image.
Tracked vs Untracked
The easiest way to understand the value of tracking is to compare two images taken with the same camera and lens.
In an untracked image, only the brightest structures tend to stand out. Faint dust, weak nebulae and subtle details are much harder to separate from the background.
With tracking, longer exposures reveal significantly more signal. Faint dust around the Orion Molecular Cloud Complex becomes easier to process, the Witch Head Nebula starts to emerge from the background and smaller structures gain contrast.
The camera didn’t change.
The lens didn’t change.
The sky didn’t change.
The biggest difference was simply the ability to collect more light.
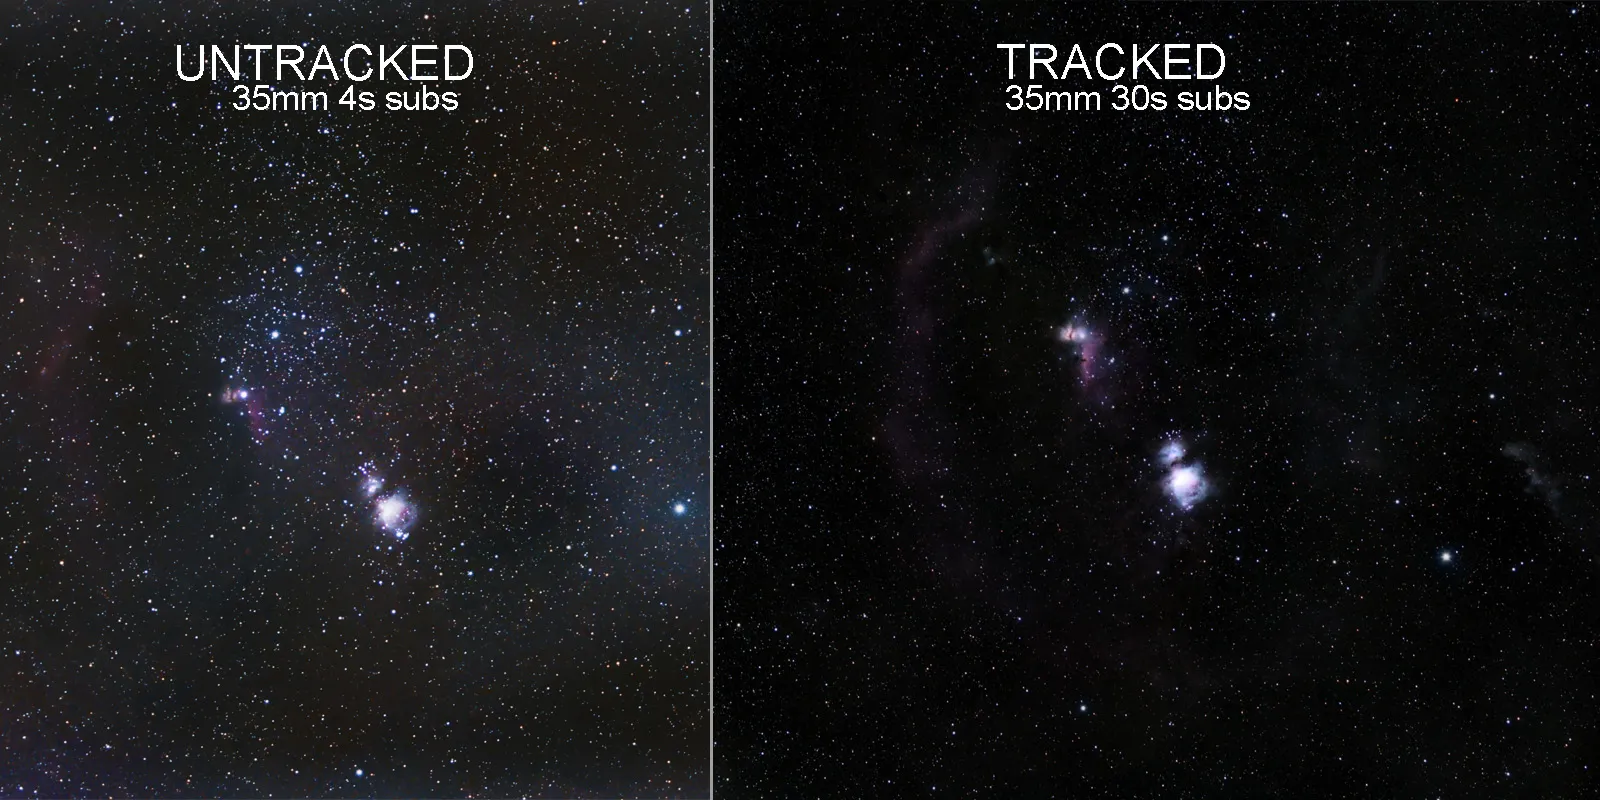
Comparison of the Orion region captured using the same Nikon D3400 and 35mm lens. Tracking allowed 30-second exposures instead of 4-second exposures, revealing significantly more faint nebula and dust detail.
Looking back, the Star Adventurer 2i had a bigger impact on my images than any camera upgrade could have at that stage.
Nikon D3400 Settings for Astrophotography
One of the first things I looked for when starting astrophotography was a list of recommended camera settings.
Unfortunately, many guides simply say “use RAW and manual mode” without explaining what settings actually work in practice.
The settings below are what I personally use with the Nikon D3400. They are not the only possible settings, but they have worked well for me across multiple projects.
Settings I Use for Untracked Astrophotography
When shooting from a fixed tripod, exposure time is the main limitation.
At 35mm, I typically use:
| Setting | Value |
|---|---|
| Mode | Manual (M) |
| Image Format | RAW (.NEF) |
| Aperture | f/2.8 |
| Shutter Speed | 4 seconds |
| ISO | 1600 |
| White Balance | Auto |
| Auto ISO | Off |
At longer focal lengths such as 100mm, I usually reduce exposure time to around 1 second to avoid star trailing.
These settings are not about maximizing brightness. They are about balancing exposure length, noise and star shape.
Settings I Use for Tracked Astrophotography
Once I started using a star tracker, my settings changed slightly.
| Setting | Value |
|---|---|
| Mode | Manual (M) |
| Image Format | RAW (.NEF) |
| Aperture | f/2.8 |
| Shutter Speed | 30 seconds |
| ISO | 800 |
| White Balance | Auto |
| Auto ISO | Off |
Longer exposures allow much more light to reach the sensor, so there is less need to push ISO.
For my setup, ISO 800 has become a good balance between signal, noise and dynamic range.
I have experimented with exposures up to two minutes, but most of my projects have been captured at 30 seconds.
Settings I Turn Off
Several Nikon features are designed for everyday photography but are not particularly useful for astrophotography.
Before starting a session, I usually disable:
- Auto ISO
- Active D-Lighting
- Long Exposure Noise Reduction
- High ISO Noise Reduction
- Auto Distortion Control
- Vibration Reduction (VR)
I also shoot exclusively in RAW format.
RAW files preserve far more information than JPEGs and provide significantly greater flexibility during processing.
Self Timer and Camera Stability
When shooting untracked, I normally use a 10-second self timer.
Pressing the shutter button can introduce small vibrations, especially when using a lightweight tripod. Waiting a few seconds before the exposure begins allows those vibrations to settle.
Once I started using computer control and automated capture software, the self timer became less important because the camera could be triggered remotely without touching it.
The 30-Second Limitation
One limitation you will eventually encounter is the Nikon D3400’s 30-second exposure limit in manual mode.
For many widefield projects this is not a problem. However, once you begin tracking and trying to collect more signal, longer exposures become attractive.
Fortunately, the D3400 supports Bulb mode, which allows exposures longer than 30 seconds when controlled externally.
I cover that topic in more detail in a separate blog post:
How I Capture Exposures Longer Than 30 Seconds on a Nikon D3400
How I Focus the Nikon D3400 at Night
Focusing was one of the hardest things to learn when I started astrophotography.
During the day, autofocus works well enough for most photography. At night, especially when photographing stars, autofocus becomes unreliable and manual focus is essential.
After a lot of trial and error, I settled on a simple process that works consistently for me.
My Focusing Process
Before doing anything else, I switch the lens to manual focus and enable Live View.
I then point the camera at a bright star and use the digital zoom function in Live View to magnify it as much as possible.
From there, I slowly rotate the focus ring back and forth while watching the star carefully.
The goal is simple:
Make the star as small and sharp as possible.
I don’t approach focus from only one direction. Instead, I move slightly past focus and then back again until I find the smallest point.
A Small Tool That Helped a Lot
One surprisingly useful accessory has been a headband magnifier.
The Nikon D3400 does not have a large flip-out screen, and judging critical focus on a small display can be difficult.
Using a magnifier makes it much easier to see subtle changes in star size while adjusting focus.
It may look a little strange, but it works.
Preventing Focus Drift
Once I achieve focus, I place a small piece of painter’s tape over the focus ring.
This prevents accidental movement during the night.
The tape is especially useful when installing a dew heater, since it is easy to bump the focus ring while attaching straps or cables.
Check Focus During the Session
Even after achieving good focus, I still verify it occasionally throughout the night.
Temperature changes can slightly alter focus, particularly during colder months.
For longer imaging sessions, I usually inspect a bright star every hour or two to make sure everything still looks sharp.
Is a Bahtinov Mask Necessary?
For camera lenses, I have not felt the need to use a Bahtinov mask.
Live View magnification has been accurate enough for my current setup.
That said, many astrophotographers use Bahtinov masks successfully, particularly with telescopes and longer focal lengths.
If you struggle to achieve consistent focus, a Bahtinov mask is worth considering.
Focus Is More Important Than Camera Settings
If there is one lesson I learned early, it is that perfect settings cannot compensate for poor focus.
A slightly noisy image can often be improved during processing.
An out-of-focus image usually cannot.
Whenever I start a session, I would rather spend an extra ten - fifteen minutes checking focus than discover several hours later that the stars were never sharp in the first place.
Why Calibration Frames Matter
When I first started astrophotography, I focused almost entirely on light frames.
The logic seemed simple: more exposure time should mean a better image.
While that is true, I eventually learned that calibration frames can make a noticeable difference, especially when imaging from light-polluted skies.
Today, I try to capture calibration frames whenever I invest significant time into a project.
The Three Main Types of Calibration Frames
For DSLR astrophotography, I use:
- Dark frames
- Bias frames
- Flat frames
Each serves a different purpose.
Dark Frames
Dark frames are captured using the same settings as the light frames, but with the lens cap on.
They help reduce:
- Hot pixels
- Thermal noise
- Fixed pattern noise
For example, if I capture my lights at 30 seconds and ISO 800, I use the same settings for the dark frames.
Bias Frames
Bias frames are the shortest exposures the camera can take.
On the Nikon D3400, that is typically 1/4000 second.
Bias frames help measure the camera’s read noise and are used during calibration.
They are quick to capture and can often be reused for multiple projects.
Flat Frames
Flat frames correct optical imperfections.
These include:
- Vignetting
- Dust shadows
- Uneven illumination
Of all the calibration frames, flats probably made the biggest visual difference for me.
Without flats, gradients and vignetting are much harder to remove cleanly during processing.
With flats, backgrounds become more even and easier to work with.
Are Calibration Frames Mandatory?
Not necessarily.
If you are taking your first astrophotography images, it is perfectly reasonable to focus on learning the basics first.
That said, calibration frames become increasingly valuable as your projects become more ambitious.
If you spend several hours collecting data on a target, it makes sense to spend the time capturing calibration frames as well.
My Typical Calibration Workflow
For most tracked projects, I aim for approximately:
| Frame Type | Typical Count |
|---|---|
| Light Frames | As many as possible |
| Dark Frames | 20–50 |
| Bias Frames | 50–100 |
| Flat Frames | 20–50 |
The exact numbers are not critical.
Consistency matters far more than chasing a specific number.
Calibration Frames Save Time Later
Taking calibration frames requires extra effort at the end of an imaging session.
Processing a poorly calibrated image usually requires much more effort.
Over time, I found that doing the extra effort collecting calibration frames saves far more time during processing and generally produces cleaner results.
For projects involving several hours of integration time, calibration frames have become a standard part of my workflow.
Lessons Learned Along the Way
Looking back at my first astrophotography sessions, there are several things I wish I had understood earlier.
Some of these lessons would have saved me time. Others would have saved me frustration.
Total Integration Time Matters More Than Individual Settings
As a beginner, I spent a lot of time worrying about ISO, exposure length and camera settings.
Those things matter, but not nearly as much as total integration time.
A small improvement in ISO or exposure length rarely produces a dramatic difference.
Adding another hour or two of data often does.
If I could give one piece of advice to my past self, it would be this:
Collect more data.
You Don’t Need Expensive Equipment to Start
Astrophotography can become an expensive hobby very quickly.
There is always a better mount, a better camera, a better telescope or a darker location somewhere else.
That can make it easy to fall into the trap of thinking you need to upgrade before you can improve.
In reality, some of my most important lessons came from using simple equipment and learning how to get the most out of it.
The Nikon D3400 taught me how to focus, frame targets, stack images and process data. Those skills remain useful regardless of what equipment I use in the future.
Don’t Delete Frames Because of Satellites or Aircraft
One mistake I made early on was manually deleting every frame that contained a satellite or aircraft trail.
Modern stacking software is surprisingly good at rejecting these artifacts automatically.
Unless a frame has other problems, I usually keep it and let the stacking process handle the rejection.
Dew Can End a Session Faster Than Clouds
Before I started using a dew heater, I occasionally lost entire sessions because moisture formed on the lens.
The frustrating part is that it often happens gradually.
Everything looks fine at first, and then stars become softer and contrast starts to disappear.
A simple dew heater is one of the most useful accessories I’ve added to my setup.
Spare Batteries Are Worth Having
Astrophotography sessions rarely end exactly when you expect them to.
Cold temperatures and long imaging runs can drain batteries faster than anticipated.
Having a second battery available removes a lot of unnecessary stress and helps avoid ending a session early.
Polar Alignment Doesn’t Need to Be Perfect on Day One
When I first started using a star tracker, I spent a lot of time worrying about achieving perfect polar alignment.
While good polar alignment is important, it is also a skill that improves with practice.
My early tracked images were far from perfect, but they were still a huge improvement over untracked exposures.
The best way to learn polar alignment is simply to keep using it.
Processing Is a Skill of Its Own
Capturing data is only half of astrophotography.
Processing takes time to learn and can be just as challenging as imaging.
Some of my early data looked disappointing until I revisited it months later with better processing skills.
If your first images do not look the way you hoped, keep the raw data.
You may be surprised by what you can achieve once your processing workflow improves.
Don’t Wait for Perfect Conditions
One of the easiest excuses in astrophotography is waiting for the perfect night.
The perfect night rarely arrives.
There will always be some combination of light pollution, moonlight, clouds, haze or limited time.
Many of my favorite images were captured under conditions that were far from ideal.
The most important thing is getting outside and collecting data whenever you have the opportunity.
Frequently Asked Questions
Is the Nikon D3400 Good for Astrophotography?
Yes.
The Nikon D3400 is a capable beginner astrophotography camera that supports RAW image capture, manual exposure control and Bulb mode. While it lacks some features found on newer cameras, it is more than capable of capturing nebulae, star fields and widefield deep-sky targets.
If you already own a D3400, I would strongly recommend learning with it before considering an upgrade.
What ISO Should I Use for Astrophotography With a Nikon D3400?
The answer depends on whether you are tracking or not.
For untracked imaging, I typically use ISO 1600 because exposure times are limited to only a few seconds.
For tracked imaging, I usually use ISO 800 because longer exposures collect significantly more light and produce cleaner data.
Can You Photograph Nebulae With a Nikon D3400?
Absolutely.
Using a Nikon D3400, I have photographed:
- Orion Nebula (M42)
- Running Man Nebula (NGC 1977)
- Horsehead Nebula (Barnard 33)
- Rosette Nebula (NGC 2237)
- Witch Head Nebula (IC 2118)
A star tracker makes these targets significantly easier to capture, but the camera itself is fully capable of recording them.
Do You Need a Star Tracker?
No.
Some of my earliest astrophotography sessions were done using nothing more than a tripod and a camera lens.
A star tracker is one of the most effective upgrades you can make, but it is not required to start learning astrophotography.
In fact, shooting untracked teaches many important fundamentals such as focusing, framing and understanding exposure limits.
Can a Nikon D3400 Capture the Milky Way?
Yes.
The Nikon D3400 is fully capable of photographing the Milky Way using a wide-angle lens, tripod and short exposures. A star tracker is not required for Milky Way photography, although tracking can improve image quality and reduce noise.
Should I Upgrade My Nikon D3400?
That depends on what is limiting you.
If you are struggling with tracking, focusing, processing or integration time, upgrading the camera is unlikely to solve those problems.
In my experience, improving technique and increasing total exposure time produced larger improvements than changing cameras.
Final Thoughts
The Nikon D3400 may not be the newest camera available, but it remains a surprisingly capable tool for astrophotography.
Over time, it helped me learn many of the skills that matter most in this hobby: focusing, tracking, framing, calibration, image processing and patience.
Some of my favorite images were captured with this camera from a suburban backyard under light-polluted skies. They were not the result of perfect equipment or perfect conditions. They were simply the result of spending time under the stars and gradually improving with each session.
If you already own a Nikon D3400, my advice is simple:
Use it.
Learn its strengths, understand its limitations and spend your time collecting data instead of worrying about upgrades.
There will always be better cameras available and another upgrade to buy.
What improved my images the most wasn’t a new camera. It was learning how to focus accurately, collect more integration time and process data more effectively.
What matters most is getting outside, gaining experience and enjoying the process.
Clear skies!